
Q: How can you have fun with a man who might grab you by the … whatever? Uh, when he’s president of the United States?
A: With your imagination, in Photoshop Elements.
During his 2016 campaign, Donald Trump called Barak Obama “The worst president in history.” Baby-boomers will quickly offer an even worse president — the only one in history to resign in disgrace. Richard Nixon.
Imagine Trump pulling off his face, which turns out to be a mask, to reveal that he’s really Nixon!
Will history repeat itself? We’ll see. In the meantime, what an interesting PSE project. I haven’t totally mastered PSE, and I’m crutching it with version 11. So if even I can pull this off, think what you can do!
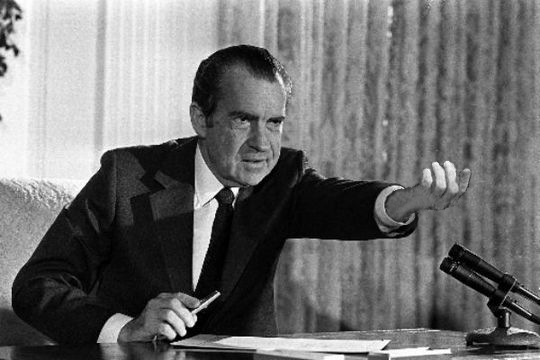
First I need a picture of Nixon, preferably one in which he’s close to the position I need — holding one hand out in front of him. I googled a good one; and it has a simple background in the area I need to edit. This is important; I discovered by hard experience that if you remove an unwanted object from a picture, you don’t get what’s behind it — you get a hole in which you have to somehow reconstruct a background.
My picture is black and white, but that gives it an old-timey ambience, which is a clue for any kids out there who aren’t sure who Richard Nixon was.
Here we go!

I enlarge the hand, and use the stamp tool to cover the hand with background. What I need is a hand that’s holding a mask upright, not this hand.

I use the rectangular marquee to select Nixon’s other hand. I don’t need the pen, so I cut it off. I make a new file for the hand copy with File > New > Image from clipboard .

After some experimenting with my own hands to reassure myself that the little finger should be to the front, I flip the hand vertically with Image > Rotate > Flip layer vertical. The thumb is just peeking out behind the middle finger.
 I use the Magnetic Lasso to select the hand and omit everything else. This tool automatically follows a border between contrasting color areas. I help it by clicking on anchor-points I want the line to extend to, when it seems unsure. If the line starts to veer off, I can just hit delete to take out an anchor-point.

I invert the selection. Now everything BUT the hand is selected.

I erase the stuff around the hand with the Eraser tool. My selection works like an eraser shield. (Kids, that’s a thin sheet of metal with variously-shaped holes in it that we used in the 20th century to limit the scope of our erasing.) It protects the hand.

Select > All the edited hand, and Edit > Copy it. Edit > Paste it on Nixon’s left arm. Not very convincing!
How can I make it better? (There’s a lot of trial and error going on here; with Undo to back out mistakes, why not?)

Because the paste created a new layer, I can select that layer and move it around. I hover my mouse near a corner handle and drag to rotate the hand into a better position.

I fix up the hand, erasing extra junk that came along with it and stamping more back and wrist from the skin I have to work with. I give up on the hidden thumb; let’s say it’s behind the mask. Okay, it’s not perfect; but I’m hoping that the Trump mask will distract you from my bad anatomy. I use the color-selector and the brush to extend Nixon’s shirt- and jacket-sleeves around the rear of the hand.
From a distance, not too bad.
Next; Trump’s face!

Brilliant! inspired! And very accurate.
Pingback: Fun with Trump in Photoshop Elements – Part 2 | Travels, tinkering and thoughts